Back to main site

Getting Started

21
  • Purchase Domains
    • How to Purchase or Register a Domain on HostHuski
  • Transferring Domains
    • Transferring Your Domain vs Migrating Your Website: What’s the Difference?
    • How to Transfer a Domain into HostHuski
  • Purchasing Email
    • Purchasing Email
  • Free Migrations
    • Transferring Your Domain vs Migrating Your Website: What’s the Difference?
    • About Free Migrations
    • Submitting Your Migration Request
    • Checking the Status of Your Migration
  • Using Divi
    • Editing Basic Modules in Divi
    • Structure of Divi and the Divi Editor
    • Getting Started with Divi
  • Using Formidable Forms
    • Managing Form Entries in Formidable Forms
    • How to use Formidable Forms on WordPress
  • WordPress Basics
    • Managing comments on your WordPress site and preventing spam
    • Uploading images and media to use in your WordPress website
    • How to create and manage your website’s menu/navigation in WordPress
    • How to manage edit delete add update pages in WordPress
    • How to manage edit delete add update users in WordPress
    • How to write a new blog post in WordPress
    • How to manage post (blog) categories in WordPress
    • How to perform routine maintenance on your WordPress site

HostHuski Hosting

24
  • Using cPanel on HostHuski
    • How to Generate and Download a Full Backup of Your cPanel Account
    • How to login to cPanel
    • How to change your cPanel password
    • Add a DNS record to cPanel
    • Using the Disk Space Usage tool in cPanel
    • Creating a FTP (File Transfer Protocol) account in cPanel
    • How to create a subdomain in Cpanel
    • How to add a domain (add-on domains) to your account (cPanel)
    • How to create a domain alias in cPanel
    • How do I change the assigned domain for my cPanel account?
    • Installing WordPress from cPanel
    • How to Use cPanel
    • Transfer one of your hosting plans to your client or a separate account
    • How to change the PHP version of your website
    • How to log in to cPanel from your HostHuski account
    • Create a clone or staging copy of your WordPress site
    • Install or Manage Your WordPress sites
    • Logging into WordPress from cPanel
    • How to Check Server-side Traffic Reports: AWStats
  • Hosting Products & Services
    • How do I upgrade or manage my hosting account?
    • Products & Services
    • Purchasing Hosting from HostHuski
    • How do I cancel one of my hosting products?
    • What’s the difference between hosting plans and maintenance plans?

HostHuski Domains

11
  • Updating Nameservers
    • How to Update the DNS Nameservers at GoDaddy
    • DNS & Name Server management
    • How to update your Namecheap.com Nameservers
    • How to update your Register.com Nameservers
  • Pointing Your Domain
    • Make one of your domains redirect to another address
    • How to point your domain to Shopify
    • How to point your domain to HostHuski
  • DNS Records
    • Managing DNS records (A, CNAME, MX, TXT etc)
  • Domain Renewal and Expiration
    • What happens if I don’t renew my domain and let my domain expire?
    • Why do I have to verify ownership of my domain?
  • Domain FAQ
    • What’s the difference between a subdomain and a domain?

HostHuski Account

4
  • Billing & Account Management
    • How do I change my billing settings and credit card info on file?
    • How do I close or delete my HostHuski account completely?
  • Upgrading & Downgrading Products
    • Upgrading/Downgrading Products
    • Upgrading/Downgrading HuskiMail

HuskiMail Business Email

14
  • HuskiMail is not loading, Connection Timed Out Error
  • HuskiMail Account
    • Managing Email Accounts for the Organization
    • How to add more email accounts and storage space to HuskiMail
    • Adding Email Forwarders to HuskiMail
    • Changing passwords for your HuskiMail email accounts
  • Using HuskiMail
    • HuskiMail is not loading, Connection Timed Out Error
    • Getting Started with HuskiMail
    • Using HuskiMail in your Web Browser
    • Using HuskiMail in Your Favorite Email Application On Your Phone or Computer
    • Troubleshooting HuskiMail
    • Using HuskiMail to send mail for your website (SMTP)
    • HuskiMail DNS Settings and SPF
  • HuskiMail Email Inbox Settings
    • Setting Up Your Email Signature
    • Removing the “Sent via Huskimail” link in your emails

HostHuski Partners

3
  • Pointing your domain to your partner staging account
  • How to Use Partner Features
    • Using your Partner discount
    • Creating staging sites for your clients

Troubleshooting

16
  • How to perform routine maintenance on your WordPress site
  • My site is running slow
  • WordPress Troubleshooting
    • How to perform routine maintenance on your WordPress site
    • Check Server Info, PHP, Site Size, Database Size and More from the WordPress Admin Dashboard
    • My site is running slow
    • Error establishing database connection
    • WordPress Password Reset Not Working
    • Notification emails from my website are going to the spam or junk folder or not being delivered
    • Blank or White Screen
    • My site looks weird all of the sudden
  • Site Errors & Crashing
    • Error establishing database connection
    • 404 Error
    • 500 Error
    • ERR_CONNECTION_TIMED_OUT
    • Is your site down?
    • My SSL Certificate isn’t working

Other Products & Services

3
  • Termageddon Auto-Generating Privacy Policies
    • Termageddon Automatic Privacy Policies
    • Get Started with Termageddon Auto-Generating Privacy Policies
    • Setup a Privacy Policy for your business

Advanced Tips & Tricks

11
  • How to Redirect a Page or Website Using htaccess
  • How to Create a User-friendly URL Using htaccess
  • How to Restrict Access to Directories by IP Address
  • How to Ban Any IP Address via htaccess
  • How to Redirect a Page to Another Page or Website Using htaccess
  • How to Disable Directory Browsing Using the htaccess Rule
  • How to Protect the htaccess File
  • How to Create a User-friendly URL Using htaccess
  • How to Disable Directory Browsing Using the htaccess Rule
  • How to Block Any IP Address via an htaccess Rule
  • How to Protect Your htaccess File
View Categories
  • Home
  • Docs
  • HostHuski Hosting
  • Using cPanel on HostHuski
  • Create a clone or staging copy of your WordPress site

Create a clone or staging copy of your WordPress site

Sometimes you need to make a copy of your website. This can be for duplicating a site for another domain or URL (cloning), or for working on changes safely before pushing them to live (staging).

To take an existing WordPress site from your hosting plan and clone or stage it, you’ll follow these steps, first. We’ll assume you are already logged into cPanel.
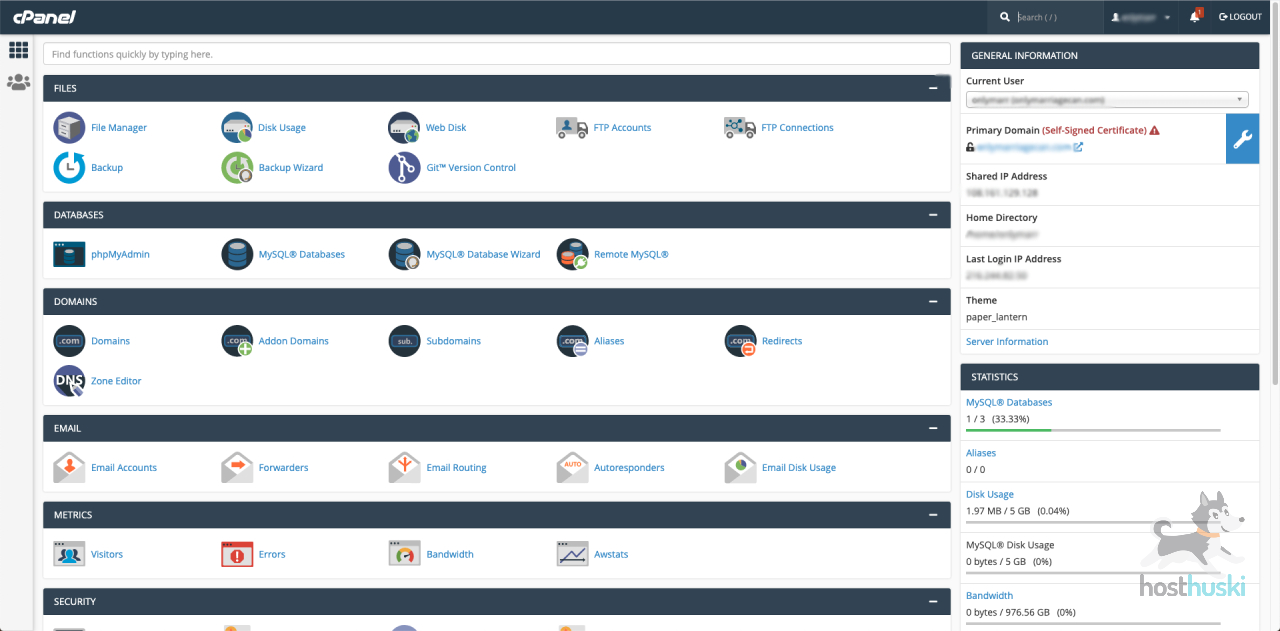
1. Open your cPanel

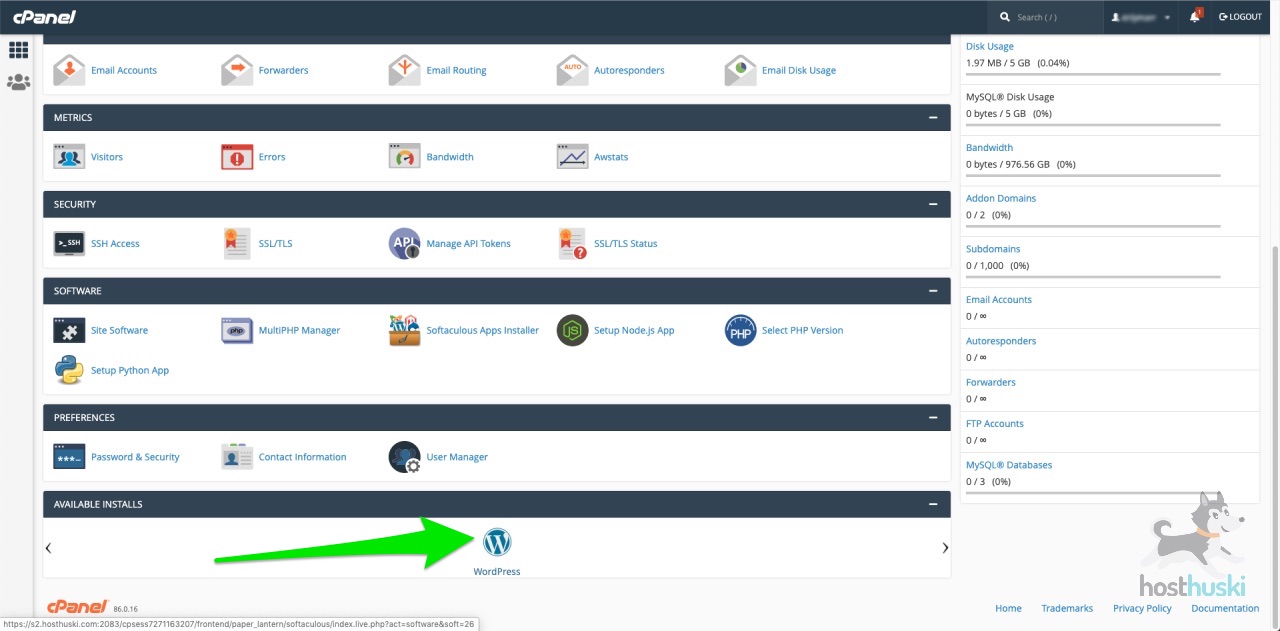
2. Scroll all the way to the bottom of the control options and click the blue WordPress icon.

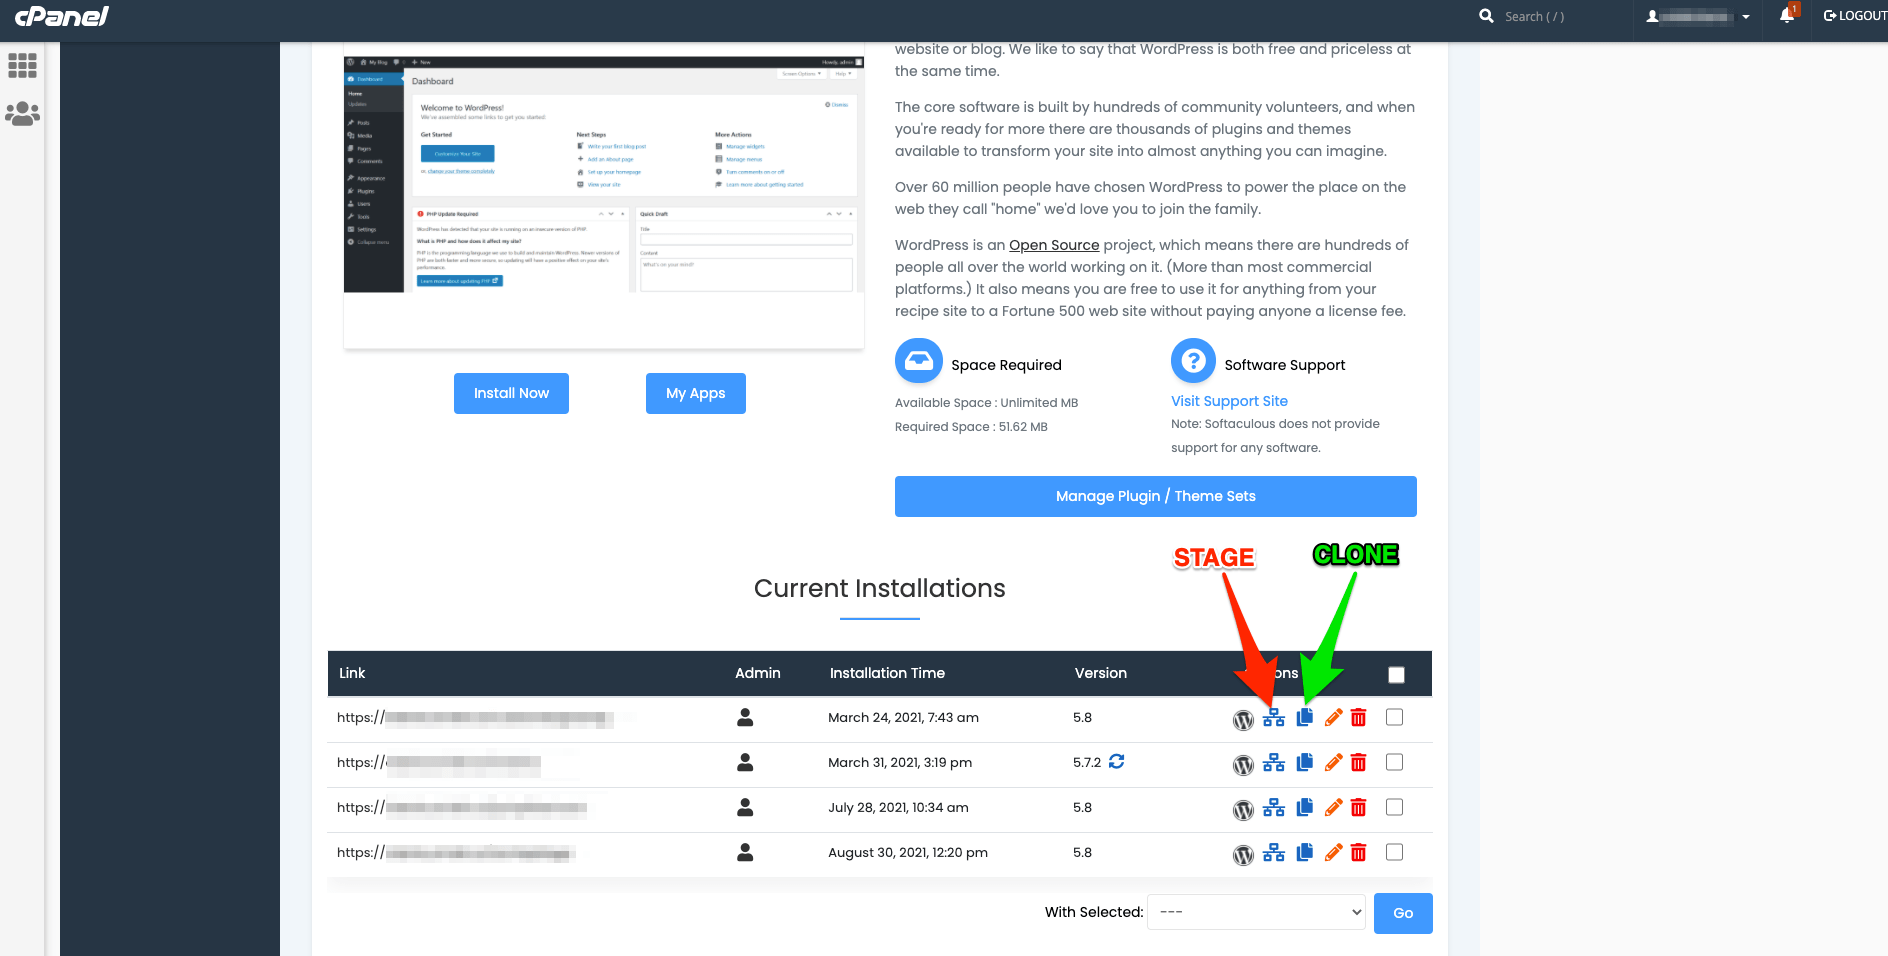
3. Scroll down until you see a list of your existing WordPress installs. And select one of two options: cloning or  staging.

Staging #

Staging creates a new copy of your site that you can edit and then push the changes to your live site.

1. To create a stage for your site, select the Stage button next to the install you want to stage.

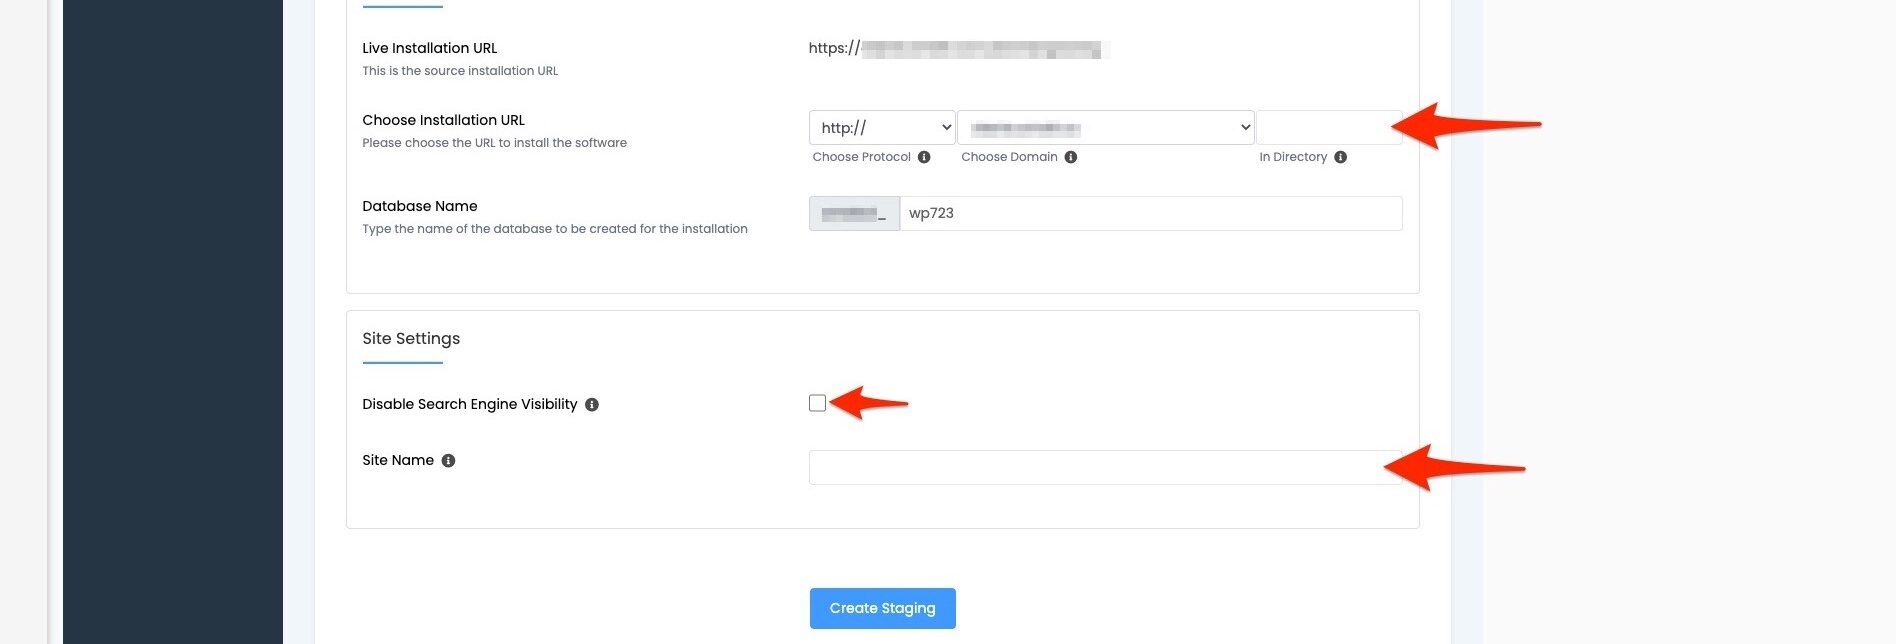
2. Then fill the form on the next screen.

Directory: This is how the new URL for the staging site will be. Common value to put here is “stage”

Disable Search Engine Visibility: Recommended. This ensures your staging site doesn’t appear in search results.

Be sure to enable Search Engine Visibility before pushing changes to live! Otherwise, your site will not appear in search engine search results.

Site Name: This is a very helpful field when you are comparing two different versions of the same site. Add the desired title of the site followed by “(Stage)” in this field for best results. It will help you differentiate between the LIVE version of the site, and the staging (think: “under construction”) version of the site.

Cloning #

Cloning your WordPress site creates a duplicate of your site that you can edit but will not act like a stage where you can push changes to live.

1. To create a new clone, select the Clone button next to the install you want to clone.

Fill the form on the next screen.

Directory: This is how the new URL for the cloned site will be. You can also change the domain in the dropdown menu before this field.

Disable Search Engine Visibility: Not Recommended. This causes your cloned site to not appear in search results in search engines.

Site Name: This is a very helpful field when you are comparing two different versions of the same site. Add the desired title of the site in this field. You’ll want to ensure it is called something different than the original site title of the site you are cloning.

That’s it!

What are your feelings about this article?

  • Happy
  • Normal
  • Sad
How to log in to cPanel from your HostHuski accountInstall or Manage Your WordPress sites

Submit a Comment

You must be logged in to post a comment.

Table of Contents
  • Staging
  • Cloning

© Copyright 2024 by SmallDot LLC DBA HostHuski. All rights reserved. | Back to main site.